
Hello everyone, sharing is caring, we are happy to share some new knowledge with you. We have prepared a Nginx tutorial, which is divided into three series. If you have heard about Nginx or want to improve the experience and understanding of Nginx, Then congratulations, you have come to the right place.
We'll tell you how Nginx works and the ideas behind it, and how to optimize to speed up application performance, how to install boot and keep running.
This tutorial has three parts:
Basic Concepts - This section needs to understand some of Nginx's directives and usage scenarios, inheritance models, and how Nginx chooses the server block, the order of locations.
Performance - Describes the methods and techniques for improving Nginx speed. We'll talk about gzip compression, caching, buffers, and timeouts here.
SSL installation - how to configure the server to use HTTPS
To create this series, we hope that, as a reference book, you can quickly find related solutions (such as gzip compression, SSL, etc.) or read the full text directly. For better learning, we recommend that you install Nginx natively and try to practice it.
Tcp_nodelay, tcp_nopush and sendfile
Tcp_nodelay
In the early days of TCP development, engineers faced the problem of traffic conflicts and congestion, and a large number of solutions emerged, one of which was the algorithm proposed by John Nagle.
Nagle's algorithm is designed to prevent communication from being overwhelmed by a large number of packets. This theory does not involve the processing of full-size tcp packets (maximum message length, MSS for short). Only for packets smaller than the MSS, these packets will only be sent when the receiver successfully sends back all acknowledgments of the previous packet (ACK). While waiting, the sender can buffer more data before sending.
If package.size >= MSS.size
Send(package)
Elsif acks.all_received?
Send(package)
Else
# acumulate data
End
At the same time, another theory was born, delay ACK
In TCP communication, after sending data, you need to receive an echo packet (ACK) to confirm that the data was successfully transmitted.
The delayed ACK is intended to resolve situations where the line is heavily congested by ACK packets. In order to reduce the number of ACK packets, the receiver waits for the data to be sent back and adds the ACK packet back to the sender. If there is no data to be sent back, the ACK must be sent at least every 2 MSS, or every 200 to 500 milliseconds ( In case we don't receive the package anymore).
If packages.any?
Send
Elsif last_ack_send_more_than_2MSS_ago? || 200_ms_timer.finished?
Send
Else
# wait
End
As you may have noticed at the outset - this can lead to some temporary deadlock on persistent connections. Let's reproduce it!
Assumption:
The initial congestion window is equal to 2. The congestion window is part of another TCP mechanism called slow start. The details are not important now, just remember that it limits how many packages can be sent at a time. In the first round trip, we can send 2 MSS packages. In the second transmission: 4 MSS packets, the third transmission: 8 MSS, and so on.
4 cached packets waiting to be sent: A, B, C, D
A, B, C are MSS packages
D is a small bag
Scenes:
Due to the initial congestion window, the sender is allowed to transmit two packets: A and B.
The receiver sends an ACK after successfully obtaining the two packets.
The sender sends a C packet. However, Nagle prevents it from sending D packets (the packet length is too small, waiting for C's ACK)
At the receiving end, the delayed ACK prevents him from sending an ACK (sent every 2 packets or every 200 milliseconds)
After 200ms, the receiver sends an ACK for the C packet.
The sender receives the ACK and sends the D packet.
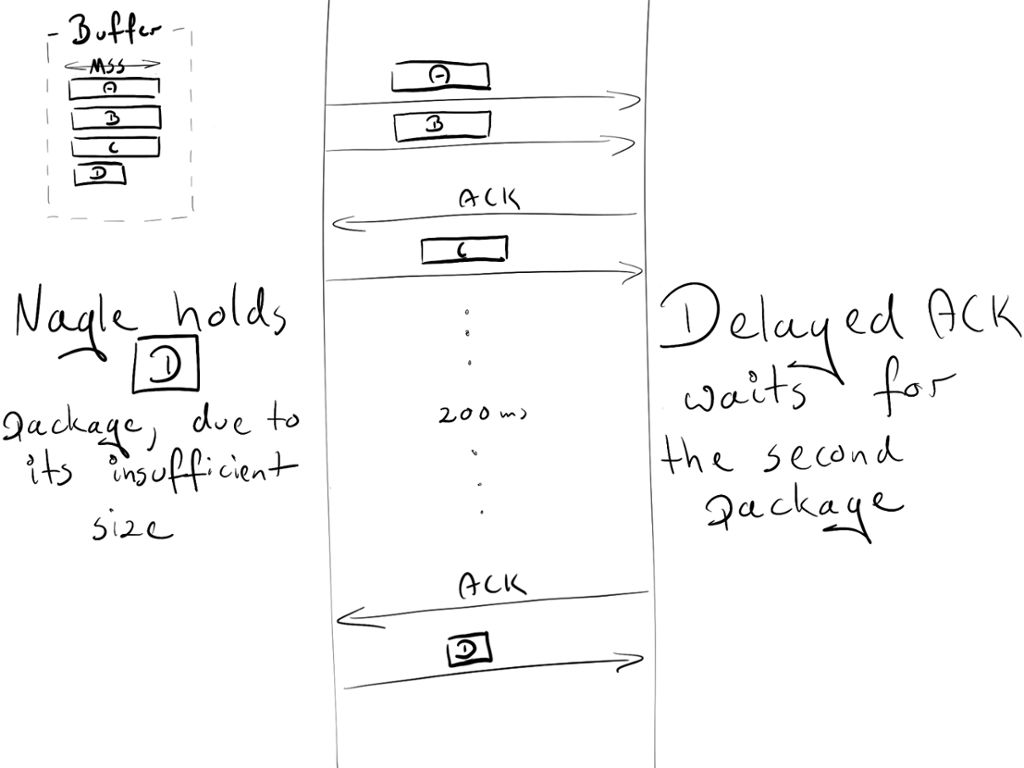
During this data exchange, a 200ms delay was introduced due to a deadlock between Nagel and delayed ACK.
The Nagle algorithm was the real savior at the time, and it still has great value. But in most cases, we won't use it on our site, so we can safely turn it off by adding the TCP_NODELAY flag.
Tcp_nodelay on; # sets TCP_NODELAY flag, used on keep-alive connections
Enjoy this 200ms speed!
Sendfile
Normally, the following steps are required when sending a file:
Malloc(3) – allocates a local buffer to store object data.
Read(2) – Retrieve and copy objects to the local buffer.
Write(2) – copies the object from the local buffer to the socket buffer.
This involves two context switches (read, write) and makes the second copy of the same object unnecessary. As you can see, this is not the best way. Fortunately, there is another system call that improves the efficiency of sending files. It is called: sendfile(2) (unexpected! Actually this name). This call retrieves an object in the file cache and passes the pointer (without copying the entire object), passing directly to the socket descriptor, which Netflix uses to increase network throughput from 6 Gbps to 30 Gbps using sendfile(2).
However, sendfile(2) has some caveats:
Not available for UNIX sockets (for example: when sending static files through your upstream server)
Can you perform different operations depending on the operating system?
Open it in nginx
Sendfile on;
Tcp_nopush
Tcp_nopush is the opposite of tcp_nodelay. Rather than pushing packets as fast as possible, its goal is to optimize the amount of data sent at once.
It will force the packet to reach its maximum length (MSS) before being sent to the client. And this command only works when the sendfile is turned on.
Sendfile on;
Tcp_nopush on;
It seems that tcp_nopush and tcp_nodelay are mutually exclusive. However, if all three instructions are turned on, nginx will:
Make sure the packet is full before it is sent to the client
For the last packet, tcp_nopush will be deleted - allowing TCP to send immediately, with no 200ms delay
How many processes should I use?
Work process
The worker_process directive specifies how many workers should be run. This value is set to 1 by default. The safest setting is to use the number of cores by passing the auto option.
But because of Nginx's architecture, it handles requests very quickly – we might not use more than 2-4 processes at a time (unless you are hosting Facebook or performing some CPU-intensive tasks inside nginx).
Worker_process auto;
Worker connection
The directive that is directly bound to worker_process is worker_connections. It specifies how many connections a worker process can open at one time. This number includes all connections (such as connections to a proxy server), not just connections to clients. Also, it's worth remembering that a client can open multiple connections while getting other resources.
Worker_connections 1024;
Open file limit
"Everything is a file" on a Unix-based system. This means that documents, directories, pipes, and even sockets are files. The system has a limit on how many files a process can open. To see this limit:
Ulimit -Sn # soft limit
Ulimit -Hn # hard limit
This system limit must be adjusted according to worker_connections. Any incoming connection will open at least one file (usually two connection sockets and a backend connection socket or a static file on disk). So this value is equal to worker_connections*2 is safe. Fortunately, Nginx provides a configuration option to increase the value of this system. To use this configuration, add the appropriate number of worker_rlimit_nofile directives and reload nginx.
Worker_rlimit_nofile 2048;
Configuration
Worker_process auto;
Worker_rlimit_nofile 2048; # Changes the limit on the maximum number of open files (RLIMIT_NOFILE) for worker processes.
Worker_connections 1024; # Sets the maximum number of simultaneous connections that can be opened by a worker process.
Maximum number of connections
As mentioned above, we can calculate how many concurrent connections can be processed at a time:
Maximum number of connections =
Worker_processes * worker_connections
(keep_alive_timeout + avg_response_time) * 2
Keep_alive_timeout (more on this later) + avg_response_time tells us how long a single connection lasts. We also divide by 2. In general, you will have a client open 2 connections: one between nginx and the client, and one between nginx and the upstream server.
Gzip
Enabling gzip can significantly reduce the size of the response (message), so the client (web page) will appear faster.
Compression level
Gzip has different compression levels, from 1 to 9. Increasing this level will reduce the size of the file, but it will also increase resource consumption. As a standard we keep this number (level) at 3 – 5, as mentioned above, it will get less savings and also get more CPU usage.
This has an example of compressing files with different compression levels of gzip, with 0 representing uncompressed files.
Curl -I -H 'Accept-Encoding: gzip,deflate' https://netguru.co/
⯠du -sh ./*
64K ./0_gzip
16K ./1_gzip
12K ./2_gzip
12K ./3_gzip
12K ./4_gzip
12K ./5_gzip
12K ./6_gzip
12K ./7_gzip
12K ./8_gzip
12K ./9_gzip
⯠ls -al
-rw-r--r-- 1 matDobek staff 61711 3 Nov 08:46 0_gzip
-rw-r--r-- 1 matDobek staff 12331 3 Nov 08:48 1_gzip
-rw-r--r-- 1 matDobek staff 12123 3 Nov 08:48 2_gzip
-rw-r--r-- 1 matDobek staff 12003 3 Nov 08:48 3_gzip
-rw-r--r-- 1 matDobek staff 11264 3 Nov 08:49 4_gzip
-rw-r--r-- 1 matDobek staff 11111 3 Nov 08:50 5_gzip
-rw-r--r-- 1 matDobek staff 11097 3 Nov 08:50 6_gzip
-rw-r--r-- 1 matDobek staff 11080 3 Nov 08:50 7_gzip
-rw-r--r-- 1 matDobek staff 11071 3 Nov 08:51 8_gzip
-rw-r--r-- 1 matDobek staff 11005 3 Nov 08:51 9_gzip
Gzip_http_version 1.1;
This directive tells nginx to use gzip only in versions above HTTP 1.1. We don't cover HTTP 1.0 here, as for the HTTP 1.0 version, it's impossible to use both keep-alive and gzip. So you have to make a decision: Clients using HTTP 1.0 either miss gzip or miss keep-alive.
Configuration
Gzip on; # enable gzip
Gzip_http_version 1.1; # turn on gzip for http 1.1 and above
Gzip_disable "msie6"; # IE 6 had issues with gzip
Gzip_comp_level 5; # inc compresion level, and CPU usage
Gzip_min_length 100; #mini weight to gzip file
Gzip_proxied any; # enable gzip for proxied requests (eg CDN)
Gzip_buffers 16 8k; # compression buffers (if we exceed this value, disk will be used instead of RAM)
Gzip_vary on; # add header Vary Accept-Encoding (more on that in Caching section)
# define files which should be compressed
Gzip_types text/plain;
Gzip_types text/css;
Gzip_types application/javascript;
Gzip_types application/json;
Gzip_types application/vnd.ms-fontobject;
Gzip_types application/x-font-ttf;
Gzip_types font/opentype;
Gzip_types image/svg+xml;
Gzip_types image/x-icon;
Cache
Caching is another matter, it can increase the speed of users' requests.
The management cache can be controlled by only 2 headers:
Manage caching with Cache-Control in HTTP/1.1
Pragma backward compatibility for HTTP/1.0 clients
The cache itself can be divided into two categories: public cache and private cache. The public cache is used by multiple users. A dedicated cache is dedicated to a single user. We can easily distinguish which cache should be used:
Add_header Cache-Control public;
Add_header Pragma public;
For standard resources, we want to save for 1 month:
Location ~* \.(jpg|jpeg|png|gif|ico|css|js)$ {
Expires 1M;
Add_header Cache-Control public;
Add_header Pragma public;
}
The above configuration seems to be enough. However, there is a caveat when using a public cache.
Let us see that if we store our resources in a public cache (such as a CDN), the URI will be a unique identifier. In this case, we think gzip is turned on.
There are 2 browsers:
Old, does not support gzip
New, support gzip
The old browser sent a netguru.co/style request to the CDN. But CDN also does not have this resource, it will send a request to our server and return an uncompressed response. CDN stores files in the hash (for later use):
{
...
Netguru.co/styles.css => FILE("/sites/netguru/style.css")
...
}
Then return it to the client.
Now, the new browser sends the same request to the CDN, requesting netguru.co/style.css to get the gzip packaged resources. Since the CDN only identifies the resource by URI, it will return the same uncompressed resource for the new browser. The new browser will try to extract unpackaged files, but will get useless stuff.
We can avoid this problem if we can tell the public cache how to perform URI and encoded resource identification.
{
...
(netguru.co/styles.css, gzip) => FILE("/sites/netguru/style.css.gzip")
(netguru.co/styles.css, text/css) => FILE("/sites/netguru/style.css")
...
}
This is exactly what Vary Accept-Encoding: is done. It tells the public cache that resources can be distinguished by URI and Accept-Encoding header.
So our final configuration is as follows:
Location ~* \.(jpg|jpeg|png|gif|ico|css|js)$ {
Expires 1M;
Add_header Cache-Control public;
Add_header Pragma public;
Add_header Vary Accept-Encoding;
}
time out
Client_body_timeout and client_header_timeout define how long nginx should wait for a client to transmit a body or header before throwing a 408 (Request Timeout) error.
Send_timeout Sets the timeout for sending a response to the client. The timeout is set only between two consecutive write operations, not the transfer process for the entire response. If the client does not receive anything at any given time, the connection will be closed.
Be careful when setting these values, because waiting too long can make you vulnerable to attackers, and waiting too long can cut off connections to slower clients.
# Configure timeouts
Client_body_timeout 12;
Client_header_timeout 12;
Send_timeout 10;
Buffers
Client_body_buffer_size
Set the buffer size for reading the client request body. If the request body is larger than the buffer, the entire body or only part of it is written to the temporary file. For client_body_buffer_size, setting the 16k size is sufficient in most cases.
This is another setting that can have a huge impact and must be used with caution. Too small, nginx will continue to use I/O to write the rest to the file. Too big, you can be vulnerable to DOS attacks when an attacker can open all connections but you can't allocate enough buffers on the system to handle them.
Client_header_buffer_size and large_client_header_buffers
If the header does not match client_header_buffer_size, large_client_header_buffers will be used. If the request is not suitable for large_client_header_buffers, an error will be returned to the client. For most requests, a 1KB cache is sufficient. However, if a request contains a large number of records, 1KB is not enough.
If the length of the request line is exceeded, a 414 (the requested URI is too long) error will be returned to the client. If the requested header length is exceeded, a 400 (error request) error code will be thrown
Client_max_body_size
Set the maximum allowable range of the client request body and specify the "content length" in the request header field. If you want to allow users to upload files, adjust this configuration to suit your needs.
Configuration
Client_body_buffer_size 16K;
Client_header_buffer_size 1k;
Large_client_header_buffers 2 1k;
Client_max_body_size 8m;
Keep-Alive
The TCP protocol that HTTP relies on requires a three-way handshake to initiate a connection. This means that three complete round trips between the client and the server are required before the server can send data (such as images).
Suppose you request /image.jpg from Warsaw and connect to the nearest server in Berlin:
Open connection
TCP Handshake:
Warsaw ->------------------ synchronize packet(SYN) ----------------->- Berlin
Warsaw -<--------- synchronise-acknowledgement packet(SYN-ACK) ------<- Berlin
Warsaw ->------------------- acknowledgement(ACK) ------------------->- Berlin
Data transfer:
Warsaw ->---------------------- /image.jpg --------------------- ------>- Berlin
Warsaw -<--------------------- (image data) ---------------------- ----<- Berlin
Close connection
For another request, you will have to perform the entire initialization again. If you send multiple requests in a short time, this may accumulate quickly. In this case, the keep-alive is convenient to use. After a successful response, it remains idle for a given period of time (for example, 10 seconds). If there is another request during this time, the existing connection will be reused and the idle time will be refreshed.
Nginx provides several instructions to adjust the keepalive settings. These can be divided into two categories:
Keep-alive between client and nginx
Keepalive_disable msie6; # disable selected browsers.
The number of requests a client can make over a single keepalive connection. The default is 100, but a much higher value can be especially useful for testing with a load-generation tool, which generally sends a large number of requests from a single client .
Keepalive_requests 100000;
# How long an idle keepalive connection remains open.
Keepalive_timeout 60;
Keep-alive between nginx and the upstream server
Upstream backend {
# The number of idle keepalive connections to an upstream server that remain open for each worker process
Keepalive 16;
}
Server {
Location /http/ {
Proxy_pass http://http_backend;
Proxy_http_version 1.1;
Proxy_set_header Connection "";
}
}
Our Professional 80W solar panel manufacturer is located in China. including Solar Module. PV Solar Module, Silicon PV Solar Module, 80W solar panel for global market.

80W solar panel, solar panel, PV solar panel, high efficiency solar panel 80W
Jiangxi Huayang New Energy Co.,Ltd , https://www.huayangenergy.com