
[Classic 51 lazy 5 step speed method-05] Introduction to application design and advanced microcontroller is also a tool to solve the problem, how to flexibly use the peripheral modules that have been mastered to meet the functional requirements to solve the actual problem, we learn microcontroller development The goal. Your program is written very quickly, and each peripheral is very slippery, and it doesn't mean that your ability to solve problems is good. This requires the accumulation of practical training and experience.
In fact, each engineer will form his own thinking mode and development habits more or less in the process of continuous development. Therefore, what we have expounded in this section is only my own thinking mode and design habits, which can be used as a reference. 1, the topic needs
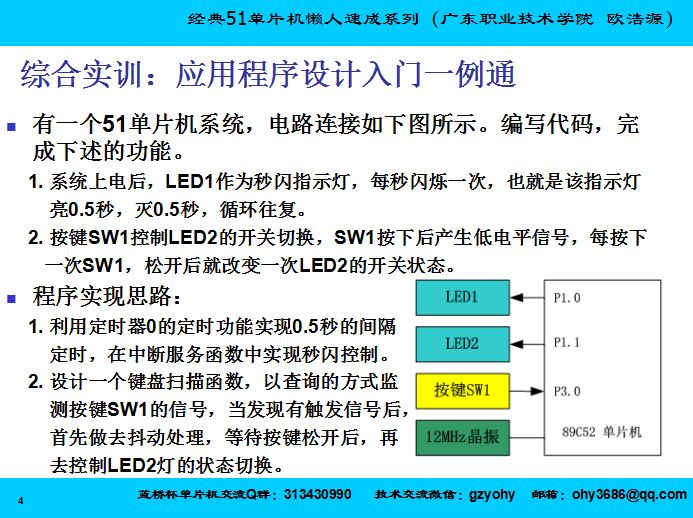
2, the basic idea
My design pattern is top-down, from the whole to the local. So, before writing the code, I basically have a more complete outline in my mind, including which variables should be defined, which functions should be arranged, and how the program framework is roughly.
From the needs analysis of this question, we can get the following information:
<1> The second flash function requires the use of timer 0. An initialization function Init_Timer0() and an interrupt service function SeviceTimer0() must be arranged.
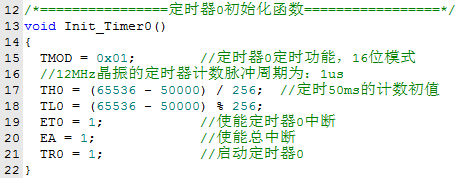
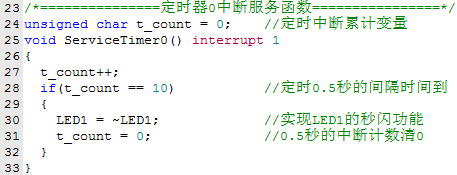
<2> Timer 0 uses 16-bit mode. In the case of 12MHz crystal oscillator, the maximum timing value is only 65.535ms. Therefore, if it is not possible to directly realize the timing of 500ms, it needs to be accumulated multiple times. It is convenient to determine the interval of timer 0 as 50ms. If the accumulated time is 500ms, then a timing accumulation variable t_count is needed.
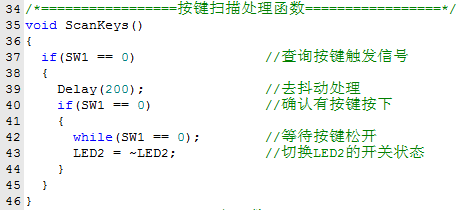
<3> For the button function, first define a key scan function ScanKeys(). In the scanning process, you need to do the debounce processing, then arrange a simple delay function Delay().
<4> Think again, what else? No more. 3, the program framework
Strictly speaking, you should make the program's flowchart and data definition table before you start writing code.
However, for simple functions, you can do so by writing code to build the overall framework. This is the same as building a frame structure, first build the blank, and then make a unit for renovation. I like this more.
Under the guidance of basic ideas, this topic can build a program framework.
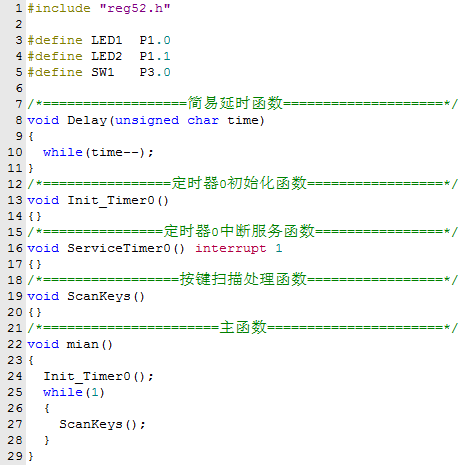
4, fill one by one
<1> Timer initialization function: This code can be reused, just copy it over.
<2> Timer interrupt service function.
<3> Key scan function.
In this way, a simple 51 microcontroller application development is complete.
5, summary
As an introductory study, this series of textbooks is over here. In fact, the content of the 51 MCU is almost so much. As for those thousands of pages of books on the development of 51 single-chip microcomputer, many of the contents are various functional peripherals, and have nothing to do with the 51 core, just use 51 single-chip microcomputer to operate those peripherals. For this part of the content, you are not learning 51 microcontrollers, but functional peripherals. In practical applications, it is more necessary to apply various peripherals to solve various problems. Therefore, the master of a single-chip computer does not play the 51 single-chip itself, but how many functional modules are in his mind, how many application codes are designed, and how many projects have accumulated experience.
The introductory tutorial is over, and your journey has just begun, come on! ! !
Curing Screen Protector,Hydrogel Phone Cutting Machine,Protective Film Cutter Machine,Screen Protcter Custting Machine
Shenzhen TUOLI Electronic Technology Co., Ltd. , https://www.szhydrogelprotector.com