
Create a new test network with pre-allocated funds and peer nodes.
In Part 1 of this series, before installing the Ethereum client, creating an account and running some simple commands, we discussed the basics of Ethereum - it's not just a cryptocurrency, it's a smart contract. Provides a decentralized platform.
In this article, we will create a private blockchain and use it to explore Ethereum in more detail. Since we will start with a brand new blockchain, we can fully synchronize this and we do not need to configure nodes to use the optical synchronization mode.
If you follow the instructions in Part 1 and configure the node to use the mainnet and run in light synchronization mode, you can stop and start it by:
$ sudo systemctl stop vice $ sudo systemctl disable vice Create a new account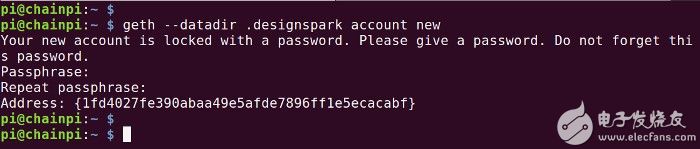
We need to provide a name for our new blockchain network. For this example, we will use "DesignSpark". By default, Ethereum stores data in a subdirectory of the home directory named ".ethereum", which is a hidden directory on Linux/BSD. To separate the data from our private blockchain, we will use ".designspark".
We begin to create a new account:
$ geth --datadir .designspark account newMake a note of the account's address, because if we want to pre-allocate any funds for it, we need this when initializing the new network.
In the beginning, only block 0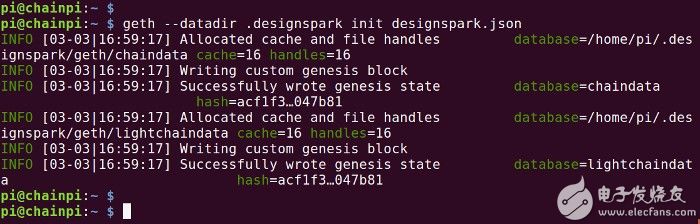
There must be the first link in the chain, and there is no difference in the blockchain. You need to create a create block that will be used by the participating node's initial set of nodes. This is configured via a JSON file. As an example, we use the following.
{ "config": { "chainId": 555, "homesteadBlock": 0, "eip155Block": 0, "eip158Block": 0 }, "difficulty": "20", "gasLimit": "2100000", "alloc" : { "1fd4027fe390abaa49e5afde7896ff1e5ecacabf": { "balance": "20000000000000000000" } }}The 'chainId' is a number that identifies the network. Here you can find a list of what the public network is using. We need to choose a number for our private DesignSpark network and for some reason 555 looks like a good choice - you can use different options for numbers.
What are the other parameters?
homesteadBlock. Homestead is an Ethereum version. For our chain, this setting is 0.
eip155Block. Our chain is not hard-forked for EIP155, so this setting is 0.
eip158Block. Our chain is not hard for EIP158, so this setting is 0.
Difficulty. This sets the difficulty of mining. In our case, we hope this is lower.
GasLimit. This is the limit for the cost of each piece of Gas.
Alloc. This is where we can pre-allocate funds to the account.
Ethereum Suggestions for Improvement (EIPs) describe the Ethereum platform's standards and may release new standards to address defects. As the network grows, it may fork at some point to allow electronic information products to be merged. This is not a concern for our private network, but for details on where EIP155 is implemented with mainnet and its role, see Spurious Dragon.
Gas is a unit used to measure how much work an action or group of actions performs. This allows costs to be added to the execution of smart contracts - including code functions and located on the blockchain, which can interact with other contracts, make decisions, store data, and send ether to other partners' partners. More about this post in the future.
Alloc allows us to pre-allocate funds to one or more accounts. The funds here have been allocated to the address of the account we created earlier.
After saving our configuration file to designspark.json, we can now initialize the network using:
$ geth --datadir .designspark init designspark.json In this way, we have already written our origin block and now we have the beginning of our new network. If subsequent nodes are initialized in the same way, they can also become members.
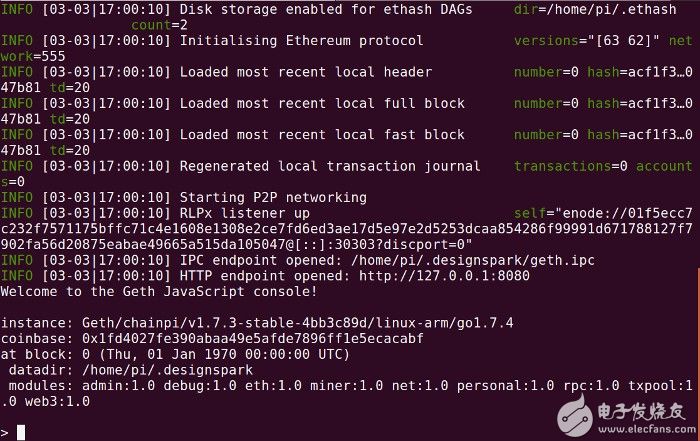
To use the JavaScript console to start the first node, we enter:
$ geth --identity chainpi --rpc --rpcport 8080 --rpccorsdomain "*" --datadir .designspark --port 30303 --nodiscover --rpcapi "db,eth,net,web3" --networkid 555 consoleWhat do all the parameters mean?
Indentity. This sets the Ethereum node ID.
Rpc*. Various RPC settings configure the available APIs and who has access to them.
Datadir. We obviously need to use the same data directory as before.
Nodiscover. This means that our node is not discoverable.
Networkid. This requires configuring the same numeric ID during initialization.
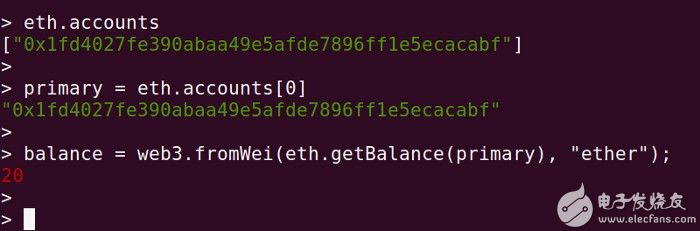
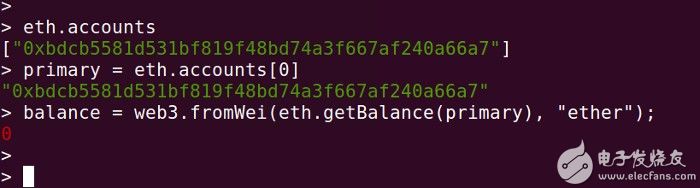
Once we enter the console, we can use eth.accounts to list the available accounts and use eth.getBalance to check the balance.
> eth.accounts> primary = eth.accounts[0]> balance = web3.fromWei(eth.getBalance(primary), "ether"); Notice how the number returned is much smaller than what we pre-allocated through designspark.json? This is because the balance in Ether is returned. In the initialization process, this allocation is actually in a smaller unit called Wei. .
A blockchain network with only one node is not very useful, so we will create another node. This suggestion uses a computer with a little more memory, such as a laptop or desktop running Debian / Ubuntu, because if we want to run the miners at some point, this may be needed.
Recall that the steps involved are:
Install GETH.
Run the command as above to create a new account.
Initialize using the same JSON configuration file.
Start the node as before, but this time using a different identity!
Once we have completed this operation, the node has been launched and put into the JavaScript console, and we can check the new account and its balance again in the following ways:
> eth.accounts> primary = eth.accounts[0]> balance = web3.fromWei(eth.getBalance(primary), "ether"); This time we should see that our balance is 0 because we did not pre-allocate any funds to the account.

Since we don't want our nodes to be discoverable, we started them with the --nodiscover option, which means that we need some way to configure them as peers. We can do this by creating a file called static nodes.json, which is located in datadir, in our case ~/.designspark.
First, we need to get the enode URL for each node by entering it on the JavaScript console on each system:
> admin.nodeInfo.enodeThen, we use this information to populate the static nodes.json file as follows:
["enode://.1.196:30303", "enode://.1.229:30303"]Notice how [::] is replaced by the node IP address and omitted? Discport = 0 suffix.
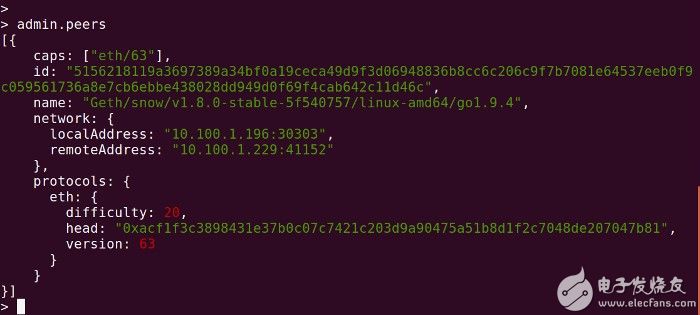
Once this file is created on both nodes, we can exit GETH with CTRL-d and then restart the console if we enter on the first node:
> admin.peersWe should see the details of the second node.
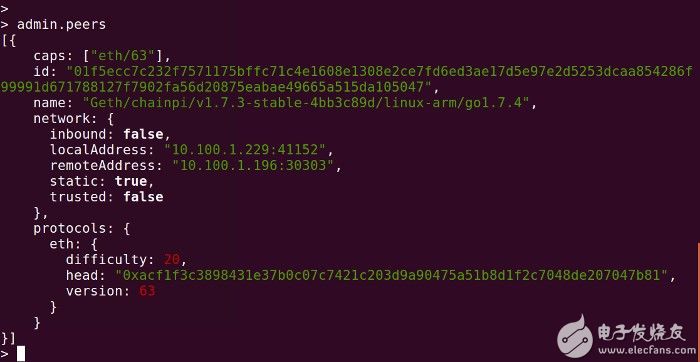
Repeat this operation on the second node, we should see the first node information.
So now we have our own private blockchain network, which contains two nodes, each with an account and one with pre-allocated funds.
In Part 3 of this series, we will continue to trade with the network - transfer funds, execute smart contracts and mine Ethernet.
Its ruggedized structure and Fashion is Slim and Light performance ensure the monitor can work stable at harsh environmental conditions. Monitor`s front bezel is made of White/Black powder coated aluminum. We provide vandal-proof protective glass or touch-screen for covering the front screen. Also we have various boards for different signal input solutions, and 12V/24V DC power input for different application requirements.
medical monitoring,monitor medical,medical monitors,medical lcd monitor,medical display monitor,medical displays
Shenzhen Hengstar Technology Co., Ltd. , https://www.angeltondal.com