
In daily life, with the rapid development of LED, we have more and more opportunities to come into contact with LED. But apart from knowing that LEDs have the characteristics of high brightness, low power consumption, long life, etc., have we ever explored the production process of an LED lamp? Here we introduce the LED manufacturing process.
1. LED chip inspection
Microscopic examination: whether there is mechanical damage on the surface of the material and whether the size of the lockhill chip and the size of the electrode meet the process requirements and whether the electrode pattern is complete
2. LED expansion
Since the LED chips are still closely spaced after dicing (about 0.1mm), it is not conducive to the operation of the subsequent process. A film expander is used to expand the film of the bonded chip, so that the distance between the LED chips is stretched to about 0.6 mm. You can also use manual expansion, but it is easy to cause bad problems such as chip drop and waste.
3.LED dispensing
Put silver glue or insulating glue on the corresponding position of the LED bracket. For GaAs and SiC conductive substrates, silver glue is used for the red, yellow, and yellow-green chips with back electrodes. For the blue and green LED chips of the sapphire insulating substrate, insulating glue is used to fix the chip.
The difficulty of the process lies in the control of the amount of glue. There are detailed process requirements in the height of the colloid and the position of the glue. Since silver glue and insulating glue have strict requirements for storage and use, the preparation, stirring, and use time of silver glue are all matters that must be paid attention to in the process.
4.LED glue preparation
Contrary to dispensing, the glue preparation is to use a glue preparation machine to first apply silver glue to the electrode on the back of the LED, and then install the LED with silver glue on the back on the LED bracket. The efficiency of glue preparation is much higher than that of dispensing, but not all products are suitable for glue preparation process.
5. LED manual thorn
Place the expanded LED chips (prepared or unprepared) on the fixture of the lancing table, place the LED holder under the fixture, and use the needle to pierce the LED chips one by one to the corresponding position under the microscope. Compared with automatic racking, manual bayonet has an advantage, it is easy to replace different chips at any time, and it is suitable for products that need to install multiple chips.
6.LED automatic rack
Auto-mounting is actually a combination of two steps: dip glue (dispensing) and chip installation. First, apply silver glue (insulating glue) on the LED bracket, and then use a vacuum nozzle to suck the LED chip to the moving position, and then place it on the The corresponding bracket position. In the process of automatic racking, it is mainly necessary to be familiar with the operation programming of the equipment, and at the same time to adjust the glue and installation accuracy of the equipment. Choose the bakelite nozzle as much as possible in the selection of the nozzle to prevent damage to the surface of the LED chip, especially the blue and green chips must use bakelite. Because the steel nozzle will scratch the current spreading layer on the chip surface.
7. LED sintering
The purpose of sintering is to solidify the silver glue, and sintering requires temperature monitoring to prevent bad batch properties. The sintering temperature of silver glue is generally controlled at 150 ℃, and the sintering time is 2 hours. According to the actual situation, it can be adjusted to 170 ℃ for 1 hour. The insulating glue is generally 150 ℃ for 1 hour.
The silver glue sintering oven must be opened every 2 hours (or 1 hour) according to the process requirements to replace the sintered product. The sintering oven shall not be used for other purposes to prevent pollution.
8.LED pressure welding
The purpose of pressure welding is to lead the electrode to the LED chip to complete the connection of the inner and outer leads of the product.
There are two types of LED welding process: gold wire ball welding and aluminum wire pressure welding. The process of aluminum wire pressure welding is to first press the first point on the LED chip electrode, then pull the aluminum wire to the corresponding bracket, and then press the second point to tear the aluminum wire. The gold wire ball welding process burns a ball before pressing the first point, the rest of the process is similar.
Pressure welding is a key link in LED packaging technology. The main need to be monitored in the process is the shape of the pressure welding gold wire (aluminum wire), the shape of the welding spot, and the tensile force.
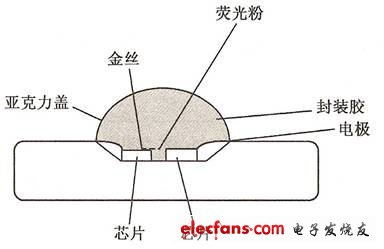
9.LED sealant
The packaging of LED is mainly three kinds of glue, potting and molding. Basically, the difficulties in process control are bubbles, lack of materials, and black spots. The design is mainly about the selection of materials, and the epoxy and bracket with good combination are selected. (General LED cannot pass the air tightness test)
LED dispensing TOP-LED and Side-LED are suitable for dispensing packages. Manual dispensing package requires high level of operation (especially white LED), the main difficulty is to control the amount of dispensing, because epoxy will thicken during use. The dispensing of white LEDs also has the problem of chromatic aberration due to phosphor precipitation.
The LED-encapsulated Lamp-LED package is encapsulated. The process of potting is to first inject liquid epoxy into the LED molding cavity, then insert the pressure-welded LED bracket, put it into an oven to allow the epoxy to cure, and then take the LED out of the cavity to form.
In the LED molded package, put the soldered LED bracket into the mold, close the upper and lower molds with a hydraulic press and evacuate, put the solid epoxy into the entrance of the injection channel, press the hydraulic ejector into the mold channel The epoxy enters each LED molding groove along the glue channel and solidifies.
10. LED curing and post curing
Curing refers to the curing of encapsulated epoxy. Generally, epoxy curing conditions are at 135 ℃ for 1 hour. Molded packages are generally at 150 ° C for 4 minutes. The post-curing is to allow the epoxy to fully cure and heat aging the LED at the same time. Post-curing is very important to improve the bonding strength between epoxy and bracket (PCB). The general condition is 120 ° C for 4 hours.
11.LED cutting and dicing
Since LEDs are connected together (not single) in production, Lamp packaged LEDs use cutting ribs to cut the connecting ribs of the LED bracket. SMD-LED is on a PCB board, and a dicing machine is needed to complete the separation work.
12.LED test
Test the photoelectric parameters of LEDs, check the external dimensions, and sort the LED products according to customer requirements.
The KSPOWER brand constant voltage led driver provides L series slim non dimmable LED Drivers also includes: LP: 5 in 1 dimmable driver, LO: 4 in 1 dimmable driver, LT: Triac/Phase-cut dimmable driver; N series outdoor junction box LED driver and NT Triac/phase dimmable driver; E series indoor junction box LED driver and ET triac/phase dimmable driver; P series plastic case LED driver. The constant voltage driver provides IP65 IP67 NEMA 3R IP20 rated environment protection for indoor and outdoor LED lighting, with or without junction box for easy installation. These led driver series is Class 2 Class P rated and high built-in PFC function, offers 5 years after-sale warranty and both ETL/cETL, UL/cUL, RU/cRU FCC CE RoHS Listed and SELV style enclosures. The led electronic driver transformers offers outstanding power performance, flicker free and protections for short circuit, over load, over voltage and over temperature. The P series LED driver compact small plastic unit size for built-in LEDs.
Power Led Drivers, Led Ac Driver, led landscaping transformer, led electronic driver, led grow light driver
Shenzhenshi Zhenhuan Electronic Co., Ltd , https://www.szzhpower.com